In one sentence: a camera turns light into a grid of numbers, and everything a computer "sees" starts — and, for a long while, ends — with those numbers.
← Handbook · Site: /learn, chapter 1 · Run: node examples/01-pixels.mjs
1. What a camera actually records
A camera sensor is a grid of tiny light meters. Each one counts how much light landed on it during the exposure and stores that as a number. A colour sensor puts a red, green or blue filter over each meter, and software combines neighbours so that every position ends up with three numbers: red, green, blue, each from 0 (none) to 255 (as much as the format can hold).
That grid is a picture element grid — pixels. Our synthetic scene is 320 pixels wide and 180 tall:
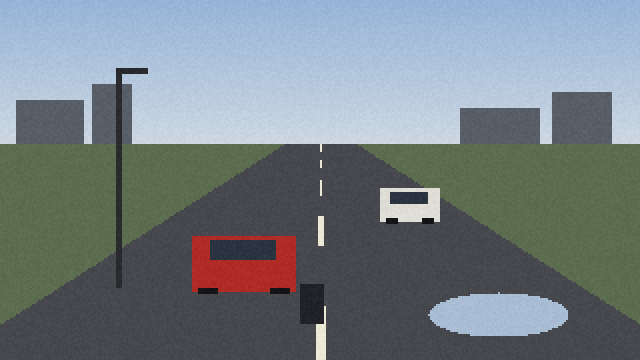
320 × 180 = 57,600 pixels
57,600 × 3 = 172,800 numbers
A real 1080p traffic camera frame is 1920 × 1080 × 3 = 6,220,800 numbers. At 25 frames per second that is over 155 million numbers every second. Computer vision is, first of all, the art of not drowning in them.
2. The numbers, for real
Here is what the example prints for four points in the scene:
sky          at (160, 10)  R=160 G=187 B=218  →  brightness 182.5
road         at (120,170)  R= 71 G= 73 B= 78  →  brightness 73.0
red car      at (100,138)  R=174 G= 40 B= 36  →  brightness 79.6
water patch  at (249,157)  R=168 G=188 B=212  →  brightness 184.8
And here is a 16 × 8 window at the red car's top-left corner, as brightness:
  75  75  68  71  74  70  71  72  70  69  71  71  70  69  73  69
  75  71  71  70  73  75  69  70  76  74  74  69  70  73  74  73
  69  71  73  70  70  71  73  69  70  73  74  68  73  74  71  74
  72  71  75  83  81  79  84  82  79  82  81  84  79  83  84  82
  74  70  70  79  81  86  81  85  80  86  81  78  84  80  86  80
  70  71  70  82  80  84  85  80  80  80  80  86  47  46  52  49
  72  76  73  80  85  84  83  85  79  82  81  85  52  50  52  52
  76  73  71  82  85  82  83  84  79  82  83  81  50  52  47  49
Read it slowly. Road (~70) on the top and left. The car body (~80) begins on row 4. The windscreen (~50) appears bottom right. Nowhere in this table is the word "car". A person looking at the picture sees a car instantly; the computer has only this. Every technique in this handbook is a way to get from a table like this one to a word like "car" — and to say how sure it is.
Try it on the site. On /learn, chapter 1 shows a live camera as this grid of numbers. Slide the control to the left: the squares grow, and once they are big enough each one prints its own brightness. The readout tells you how many numbers the grid holds against the full picture.
3. Three numbers become one: brightness
Many methods work on brightness alone. The usual formula (ITU-R BT.601, also what ffmpeg uses) weights green most, because human eyes are most sensitive to green:
brightness = 0.299 × R + 0.587 × G + 0.114 × BWorked for the red car pixel: 0.299 × 174 + 0.587 × 40 + 0.114 × 36 = 52.0 + 23.5 + 4.1 = 79.6.
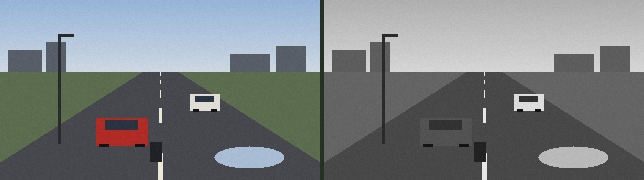
The code is one line in public/js/cv/ops.js:
export const luma = (r, g, b) => 0.299 * r + 0.587 * g + 0.114 * bHold on to this: a red car (79.6) and the road (73.0) are almost the same brightness. Chapter 02 shows what that costs.
4. Three channels
The same picture split into its red, green and blue channels (each shown in its own colour; the other two set to zero):

The red car is bright only in the red channel. The sky is bright in all three, brightest in blue. The grass is brightest in green. A colour is a relationship between three numbers, not a property of one.
5. Resolution: how many numbers you keep
Average each block of pixels into one value and you get a lower-resolution picture. From left: 32-pixel blocks, 16, 8, and the original (the red car boxed):

block 32 px → 10 × 6  = 60 numbers per channel
block 16 px → 20 × 12 = 240 numbers per channel
block  8 px → 40 × 23 = 920 numbers per channel
At 32-pixel blocks the cars are smudges; somewhere between 16 and 8 a person can tell what they are. Detectors fail in the same place: a car far down the road might be 10 pixels wide in a real frame, and there simply are not enough numbers to say "car". This is the single most common reason a camera "doesn't see" something — and the /games "fewest pixels" game lets you race the detector at exactly this.
The site's ops.pixelate(img, block) is 20 lines; read it in ops.js.
6. Why this matters beyond the classroom
- Storage and bandwidth. 155 million numbers a second, per camera. Three things follow. Cameras compress (H.264/H.265). Analysis runs on small frames (the site's motion lens works at 192 pixels wide; the detector at 640). And a city cannot "just record everything in full".
- Privacy is a resolution question. A face 8 pixels tall cannot be recognised by anyone; a face 120 pixels tall can. How a system is configured — resolution, zoom, placement — decides what it can know, long before any AI is involved.
- Every later step inherits these numbers. Noise, compression blocks, glare and darkness are in the table before any model sees it. No model can recover information that was never recorded.
Try it yourself · ลองทำเอง
เป้าหมาย · Goal: หาว่า "รถ" อยู่ตรงไหนในตารางตัวเลข และดูว่าช่องหยาบเกินไปทำให้เสียอะไร / Find where "car" lives inside a table of numbers — and watch what a too-coarse grid throws away.
ขั้นตอน · Steps
- เปิด /learn บท 1 แล้วตั้ง "จำนวนช่องตามแนวนอน" ไว้ที่ 16 — Open /learn chapter 1 and set Squares across to 16.
- หาตัวเลขที่สว่างที่สุดบนจอ แล้วเทียบกับตารางในบทนี้ (ถนนประมาณ 70 ท้องฟ้าประมาณ 180) — Find the largest number on screen and compare it with the table above: road ~70, sky ~180.
- ลดเหลือ 6 ช่อง แล้วลองบอกตัวเองดูว่าภาพนี้คืออะไร — Drop to 6 squares and try to say what the picture shows.
- ขึ้นไป 96 ช่อง แล้วอ่านตัวเลขรวมใน readout ว่าได้กี่ตัว — Go up to 96 squares and read the total count in the readout.
ควรเห็น · You should see
- ที่ 16 ช่อง ตัวเลขของถนนกับท้องฟ้าต่างกันชัดเจน แต่คำว่า "รถ" ไม่ได้อยู่ในตารางนั้นเลย — At 16 the road and sky numbers differ clearly, and the word "car" is nowhere in the grid.
- ที่ 6 ช่อง รูปร่างหายไปหมด เหลือเพียงบล็อกหยาบ ๆ — At 6 the shapes are gone; only coarse blocks remain.
ถ้าไม่เห็น · If you do not — ตัวเลขจะปรากฏก็ต่อเมื่อช่องใหญ่ (จำนวนน้อย) ถ้ายังไม่เห็น ให้เลื่อนไปทางซ้ายอีก / Numbers appear when the squares are large: slide further left.
Check yourself
1. A frame is 640 × 360 pixels in colour. How many numbers is that?
640 × 360 × 3 = 691,200.
2. Pure yellow is R=255, G=255, B=0. What is its brightness?
0.299 × 255 + 0.587 × 255 + 0.114 × 0 = 225.4 — yellow is very bright, which is why it is used on warning signs.
3. Why does the computer not "know" that the window above is a car?
Because the numbers carry no label. "Car" is a conclusion someone (a person, or a model trained on people's labels) draws from patterns in many numbers at once. Nothing in a single pixel, or a small table of them, says what it belongs to.
สรุปภาษาไทย
กล้องเปลี่ยนแสงเป็น ตารางตัวเลข แต่ละช่องเรียกว่า พิกเซล และมีตัวเลขสามตัวคือ แดง เขียว น้ำเงิน ตั้งแต่ 0 ถึง 255 ภาพตัวอย่างขนาด 320 × 180 มีตัวเลข 172,800 ตัว ส่วนกล้องจราจร 1080p มีมากกว่าหกล้านตัวต่อภาพ
เมื่อดูตัวเลขใต้รถสีแดง จะเห็นถนน (~70) ตัวรถ (~80) และกระจก (~50) แต่ ไม่มีคำว่า "รถ" อยู่ในตัวเลขเลย ทุกเทคนิคในคู่มือนี้คือวิธีเดินทางจากตารางตัวเลขไปถึงคำว่า "รถ" พร้อมบอกว่ามั่นใจแค่ไหน
ความสว่างคำนวณจาก 0.299R + 0.587G + 0.114B (ตาคนไวต่อสีเขียวที่สุด) และน่าสังเกตว่า รถสีแดงกับถนนมีความสว่างใกล้กันมาก บทที่ 2 จะแสดงว่าเรื่องนี้มีผลอย่างไร
ความละเอียดของภาพคือจำนวนตัวเลขที่เราเก็บไว้ ถ้าวัตถุอยู่ไกลจนเหลือไม่กี่พิกเซล ทั้งคนและเครื่องก็บอกไม่ได้ว่าคืออะไร และความละเอียดก็เป็นเรื่องความเป็นส่วนตัวด้วย ใบหน้าขนาด 8 พิกเซลไม่มีใครจำได้ แต่ขนาด 120 พิกเซลจำได้