In one sentence: slide a 3×3 window of weights over the picture, multiply and add at every position, and you can blur, sharpen or find edges — and a neural network is thousands of such windows whose weights were learned.
← 02 · Handbook · Site: /learn, chapters 4–5 · Run: node examples/03-convolution.mjs
1. One step, worked by hand
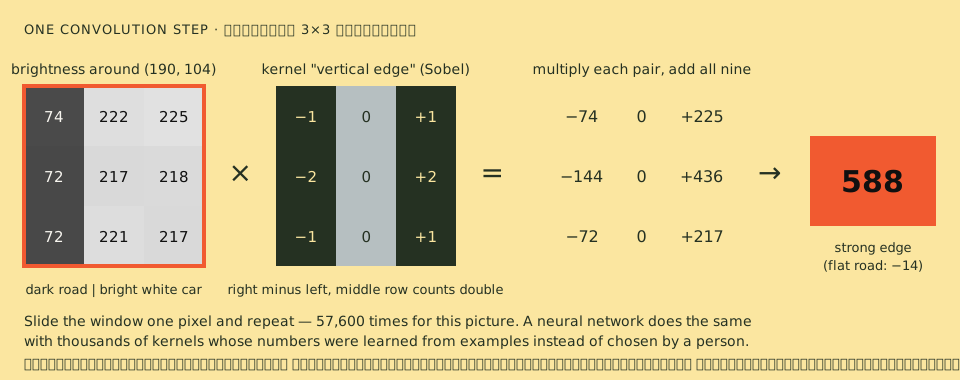
Take the pixel at (190, 104) — the left edge of the white car — and its eight neighbours. Multiply each by the matching number in a 3×3 kernel, then add all nine products:
neighbourhood (brightness)    ×   kernel "vertical edge"   =   products
   74  222  225                   -1   0   1                  -74     0   225
   72  217  218                   -2   0   2                 -144     0   436
   72  221  217                   -1   0   1                  -72     0   217

sum = 588
The kernel computes "right side minus left side" (middle row counted twice). Dark road on the left, bright car on the right: a big positive number — a strong edge running up and down. The same kernel on flat road at (110, 170) gives −14: no edge. Now slide the window one pixel to the right and repeat — 57,600 times for this picture. That full pass is a convolution, and the output is another picture.
The site's whole implementation:
// public/js/cv/ops.js — every output pixel is the weighted sum of its 3×3 neighbourhood
export function convolve3(gray, width, height, k) {
  const out = new Float32Array(gray.length)
  for (let y = 0; y < height; y++) {
    const y0 = y > 0 ? y - 1 : 0, y2 = y < height - 1 ? y + 1 : y   // clamp at the border
    for (let x = 0; x < width; x++) {
      const x0 = x > 0 ? x - 1 : 0, x2 = x < width - 1 ? x + 1 : x
      out[y * width + x] =
        k[0] * gray[y0 * width + x0] + k[1] * gray[y0 * width + x] + k[2] * gray[y0 * width + x2] +
        k[3] * gray[y  * width + x0] + k[4] * gray[y  * width + x] + k[5] * gray[y  * width + x2] +
        k[6] * gray[y2 * width + x0] + k[7] * gray[y2 * width + x] + k[8] * gray[y2 * width + x2]
    }
  }
  return out
}
2. Seven kernels, seven effects
Same picture, same code — only the nine numbers change:
identity    [    0    0    0 |    0    1    0 |    0    0    0 ]   copy the pixel
blur        [ 0.11 0.11 0.11 | 0.11 0.11 0.11 | 0.11 0.11 0.11 ]   average the neighbourhood
sharpen     [    0   -1    0 |   -1    5   -1 |    0   -1    0 ]   exaggerate difference from neighbours
edges       [   -1   -1   -1 |   -1    8   -1 |   -1   -1   -1 ]   centre minus surroundings (Laplacian-like)
vertical    [   -1    0    1 |   -2    0    2 |   -1    0    1 ]   Sobel x: left↔right change
horizontal  [   -1   -2   -1 |    0    0    0 |    1    2    1 ]   Sobel y: top↔bottom change
emboss      [   -2   -1    0 |   -1    1    1 |    0    1    2 ]   a diagonal "relief" light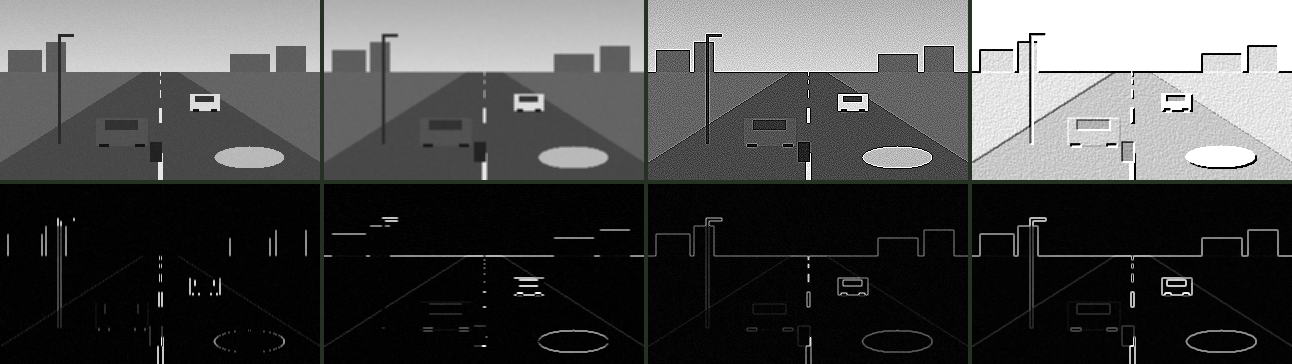
Notice:
- Vertical finds the lamp post and the car sides but misses the horizon; horizontal finds the horizon and car roofs but misses the post. Each kernel sees one direction.
- Sharpen brings out the sensor grain too. Every "enhancement" amplifies noise along with detail.
- The kernels' numbers sum to 1 (identity, blur, sharpen) — brightness is preserved — or to 0 (edge kernels) — flat regions go to zero, so only change survives.
On /learn chapter 4 you can switch kernels on a live camera and see the sum for the pixel under your cursor.
3. Sobel: edges in every direction
Combine the two directional kernels per pixel as the length of a vector:
edge strength = √( vertical² + horizontal² )
That is the Sobel operator (Irwin Sobel and Gary Feldman, 1968), still a default in image processing over half a century later. As text, from the example:
              @   @
           @  # @
  @@@@@@@@@@  # @                                                           @
          @@  * @                                        @         @        @
              #                   =          =
              #                =                =
              #             =                      =
              #          =                     @@    @
              %       =                        @         =
              %    :                   @@                   -
Outlines survive; flat regions vanish. The picture has become a drawing.
The famous next step, Canny's edge detector (1986), blurs first (to fight noise), takes Sobel, thins every edge to one pixel wide, and keeps weak edges only where they connect to strong ones. Edge maps like these powered most of computer vision until about 2012: lane detection, document boundaries, industrial inspection, and the "histogram of oriented gradients" features (Dalal & Triggs, 2005) behind the first good pedestrian detectors.
4. The bridge to deep learning
Everything above has one property: a person chose the nine numbers. Sobel picked −1, 0, 1, −2, 0, 2 by reasoning about derivatives. That works for edges. It does not scale to "wheel", "windscreen", "motorcycle helmet" — nobody can write those kernels by hand.
A convolutional neural network (CNN) keeps the sliding window and makes the numbers learnable:
| Hand-made (this chapter) | Learned (chapter 05) | |
|---|---|---|
| Kernel numbers | chosen by a person | adjusted by training on labelled examples |
| How many | 1–7 | tens of thousands across all layers |
| Stacked | rarely | 50+ layers, each convolving the last one's output |
| What they find | edges, blur | edges → textures → parts → objects |
Remarkably, when researchers look inside trained networks, the first layer's learned kernels look like edge detectors — the network rediscovers Sobel-like filters on its own. Edges are simply the most useful first thing to know about a picture (Zeiler & Fergus, 2014; and Hubel & Wiesel's 1959 finding that the cat visual cortex has cells that respond to oriented edges).
Try it yourself · ลองทำเอง
เป้าหมาย · Goal: เปลี่ยนหน้าต่าง 3×3 แล้วดูภาพทั้งภาพเปลี่ยนตาม / Change one 3×3 window and watch the whole picture change with it.
ขั้นตอน · Steps
- เปิด /learn บท 4 กดเคอร์เนลทีละปุ่ม: เหมือนเดิม เบลอ คมขึ้น ขอบ เส้นตั้ง เส้นนอน — Open /learn chapter 4 and press the kernels one by one: Identity, Blur, Sharpen, Edges, Vertical, Horizontal.
- สังเกตว่า "เหมือนเดิม" ไม่เปลี่ยนอะไรเลย นั่นคือบททดสอบว่าหน้าต่างทำงานถูกต้อง — Note that Identity changes nothing: the check that the window is doing its job.
- เทียบ "ขอบ" กับ "เส้นตั้ง" บนถนนที่มีเส้นจราจร ตัวไหนหายไป — Compare Edges with Vertical on a road with lane markings: which lines disappear?
- เปิด /learn บท 5 แล้วเลื่อน "ความไว" ขณะขยับมือช้า ๆ หน้ากล้อง — On /learn chapter 5, move Gain while sliding a hand slowly in front of the camera.
ควรเห็น · You should see
- ภาพ "ขอบ" มืดลงเหลือเส้นบาง ๆ และเปลี่ยนทันทีที่วัตถุขยับ — The Edges view goes dark except for thin lines that move the moment you do.
- "เส้นตั้ง" เก็บเส้นแนวตั้ง แล้วตัดเส้นแนวนอนทิ้ง — Vertical keeps vertical lines and drops horizontal ones.
ถ้าไม่เห็น · If you do not — ถ้าภาพยังเหมือนเดิมทุกประการ แสดงว่าเลือก "เหมือนเดิม" อยู่ ให้กด "ขอบ" ถ้าทุกอย่างดำ ให้เพิ่ม "ความไว" / If the picture never changes you are still on Identity: press Edges. If everything is black, raise Gain.
Check yourself
1. Apply the "vertical" kernel to a neighbourhood that is 100 everywhere. What is the result? Why?
0. The kernel's numbers sum to zero, so on a flat region the positive and negative halves cancel. Edge kernels report change, not brightness.
2. Why does blur reduce the number of false edges?
Noise makes neighbouring pixels differ slightly at random, which edge kernels report as tiny edges. Averaging first (blur) smooths those random differences away, while a real edge — a large, consistent difference — survives. That is why Canny blurs before Sobel.
3. A 3×3 kernel has 9 weights. A CNN layer with 32 kernels over a colour (3-channel) input — how many weights?
Each kernel spans all input channels: 3 × 3 × 3 = 27 weights, plus 1 bias (an extra number added on its own, so the answer can shift up or down), for each of 32 kernels: 32 × 28 = 896. MobileNetV2's first layer has exactly this shape — 32 filters, 3×3, stride 2 (the window jumps two pixels each step, so the output comes out half as wide) — though it uses batch normalisation (rescaling each layer's numbers so they stay in a similar range) in place of the bias: 864 kernel weights, plus normalisation parameters.
สรุปภาษาไทย
คอนโวลูชัน (convolution) คือการเลื่อน "หน้าต่าง" ขนาด 3×3 ไปทีละพิกเซล ที่แต่ละตำแหน่งให้คูณตัวเลขในภาพกับตัวเลขในหน้าต่าง (เรียกว่า เคอร์เนล) แล้วบวกกันทั้งเก้าตัว ตัวอย่างที่ขอบซ้ายของรถสีขาวได้ผลรวม 588 (ขอบชัดมาก) ส่วนบนถนนเรียบได้ −14 (ไม่มีขอบ)
เปลี่ยนแค่ตัวเลขเก้าตัว ภาพก็เปลี่ยนจากเบลอ เป็นคมชัด เป็นเส้นขอบแนวตั้ง แนวนอน โซเบล (Sobel, 1968) รวมสองทิศเป็นความแรงของขอบ ทำให้ภาพกลายเป็นภาพลายเส้น
สิ่งสำคัญที่สุด: ในบทนี้ คนเป็นผู้เลือกตัวเลข แต่ "ล้อรถ" หรือ "หมวกกันน็อก" ไม่มีใครเขียนเคอร์เนลด้วยมือได้ โครงข่ายประสาทเทียมแบบคอนโวลูชัน (CNN) ใช้หน้าต่างเลื่อนแบบเดียวกันนับหมื่นตัว แต่ตัวเลขข้างในได้มาจากการเรียนรู้จากตัวอย่าง และน่าทึ่งที่ชั้นแรกของโครงข่ายที่ฝึกแล้วมักเรียนรู้ตัวตรวจจับขอบขึ้นมาเองคล้ายโซเบล
Next: 04 · Motion →